This was the first MAME cab that i made and has since been replaced with others.
About
 Ever since I was a kid I remember
  seeing some TV show where someone had a load of arcade machines in their house and I thought how kewl that was. I have always been into games and spent way too much money in arcades. I looked into getting an Arcade machine a few years back and found that I was looking at 300 – 1500 quid depending on what game I wanted. While I was tempted it was a lot of money for one game and a lot of hassle to keep buying and swapping game boards. About the same time I found MAME, this is an emulator that runs on the PC and plays a lot of classic arcade games over 2000 at the last count. I was hooked, being able to play all those classic games all over again most of which you just wouldn’t see in an arcade anymore.
I’m not sure where I saw the first MAME cabinet. I think I read it somewhere that a company was selling them with a PC inside running MAME software. I found a company in the UK that did this but they wanted a lot of money and at that time were only doing a 5ft cabinets and I really wanted a full height one so I decided to leave it.
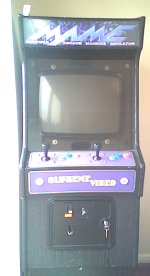
I later found some websites that people had put out there on cabinets they had converted themselves and this sounded a great idea to me. I like a challenge and it appealed to me as I could do it in stages. There seemed to be two main ways to go. Build your own cabinet from scratch or buy an old one and convert it. After a bit of phoning around I found a local dealer that had some stored away and was willing to let one go for 40 quid with no game board. This suited me great. Off I went, picked it up and shoved it in the garage. It was a JAMMA cabinet that had last had some golf game in it. It had most of what I needed. Two joysticks, 3 buttons for each player and 1 and 2 player start buttons. The cabinet itself was in good condition as well.
I left it in the garage for a bit as I was busy fitting the car stereo. But while I was doing the car I did keep thinking about it and was itching to get started. I knew I had the cabinet, it had a screen but I had no idea if it worked and knew that getting it to work with the PC would be a nightmare so I would probably need a PC monitor to go in there. I also knew I needed some way of getting the arcade controls to work with the PC.
I came across an 19″ monitor for 80 quid second hand so I brought that and that went in the garage as well with the idea of building it into the cabinet when I finally got chance to get started.
Engine
So I had the basics, Cabinet, PC was working with MAME32 connected to a PC monitor and I could use the arcade controls with the J-PAC interface. So the next task was to try this monitor out and get the software sorted. This was the beginning of a LONG night.
I had read somewhere about being careful about powering up the cabinet. One because the J-PAC could blow if there were any problems, two because if no game board was detected it might not power on any way and three because the arcade monitors carried a lot of voltage and needed treating with respect.
I thought the easiest way to do this was to isolate the power to the monitor. I found that the AC came into a box that split it up into 12 and 5 volts for the circuits and then the AC carried on to the monitor. I unplugged the connections from this box as I didn’t need to power anything else up in the cabinet so the power was just coming from the mains direct to the monitor. I flicked the power switch on the wall and heard the monitor come to life. That was a start.
The next thing that I had read was that the arcade monitors would only work with the DOS version of MAME as they wouldn’t support the refresh rate of Windows and that you needed, ideally, an ATI GFX card.
I had just borrowed an ATI all in wonder from a mate so I set about sticking Windows 98 on a PC to get Windows 98 DOS so I could get FAT 32. So this is what I did.
Load PC with windows 98
Copied dos version of MAME onto it and all my ROMS
Boot to windows on PC monitor and select restart in DOS mode.
Ran DOS version of MAME and when it ran plugged in arcade monitor.

To run the DOS version of mame you need to make sure that you have CWSDPMI which is a dos memory manager. Especially if you get the error “Load error: no dpmi” download this and uncompress cwsdpmi.exe to the same directory with MAME.
erm.. cant remember the turn of events next. I think I got some sort of result on the arcade monitor which was encouraging but I think the screen was split down the middle. After some more reading I found that everyone out there with arcade monitors was using either ArcadeOS or AdvanceMAME. These programs have the added bonus of providing a GUI frontend so you get to see all the games you have rather than having to remember horrid DOS commands.
After a lot of trying with ArcadeOS I gave up. I just couldn’t get a sensible screen res from it. So I went onto AdvanceMame and had some success with that.
Grab a copy of AdvanceMAME and AdvanceMenu from the AdvanceMAME website. This is where it gets a bit hazy as I messed around with this stuff for ages and I cant remember the order in which I did it all in. The best tip is to read the documentation on the website. The stuff that comes with the program is confusing. Follow the instructions on the site for running advcfg and then advv. Try running advmame and see if it works. If it does then try advmenu, thats the GUI frontend version. If you have probs running advmenu and not advmame try running advv -advmenu.
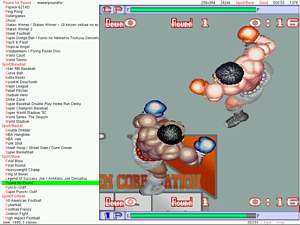
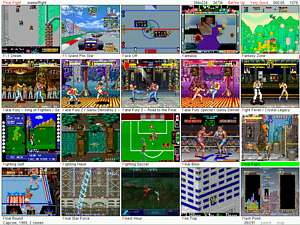
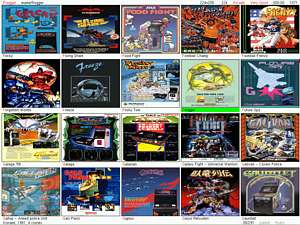
Here are some screen shots from advmenu. They show you some of the different possibilities of how you can display the list of available games.
Another thing to look at is your startup files. I have included mine here. Smartdrv will speed things up a lot and EMM386 will make sure you have plenty of RAM available.
Autoexec.bat
loadhigh keyb br,,c:\windows\command\keyboard.sys
smartdrv 512
set sound=c:\sb16
SET BLASTER=A220 I5 D1 H7 P330 T6
SET MIDI=SYNTH:1 MAP:E MODE:0
SET SBPCI=C:\PROGRA~1\CREATIVE\AUDIO\DOSDRV
keyb uk,,C:\WINDOS\COMMAND\keyboard.sys
loadhigh C:\PROGRA~1\CREATIVE\AUDIO\DOSDRV\sbinit
e:
cd mame
advmenu
Config.sys
dos=high
DEVICE=C:\WINDOWS\COMMAND\DISPLAY.SYS CON(EGA,,1)
DEVICE=C:\WINDOS\HIMEM.SYS
DEVICE=C:\WINDOS\EMM386.EXE NOEMS NOVCPI
To stop windows loading I edited msdos.sys and changed this line
BootGUI=0
You will notice that there are sound drivers in these files. I would comment these out for now until you have everything else working. Once you are happy then tackle sound as if these are set up incorrectly then you could hang the program. The settings above worked for a soundblaster 128. Make sure you do go for a soundblaster compatable card. You may also have to edit you SBPCI.ini. This is what I set mine to
SBPCI.ini
; PCI Hardware Configuration
PCIPort=e800
PCIIRQ=10
; Ports – MPU-401 and Sound Blaster Device
Port=330
SBPort=220
; IRQs – MIDI and Sound Blaster emulation
IRQ=7
SBIRQ=7
; DMA Channels for Sound Blaster emulation
DMA=1
DMA16=7
I leave windows on the arcade cabinet incase I want to use the CD rom drive or if I want to use the network to copy a load of files to the machine. I have found that if I exit windows it changes my configs and sets the soundblaster IRQ back to 7 in the autoexec.bat and SBPCI.ini. I have now made these files read only but not tested if windows respects that yet as I just tend to switch the power off rather than shutdown or exit windows now so it dont get the chance.
So other changes I made is to add the -quiet switch to advmenu and advmame to get rid of the copyright information and also added these lines to advmame. This will skip the OK screens at the start of a game
script_video delay(100); simulate_key(key_o,100); delay(100); simulate_key(key_k,100); delay(100); simulate_key(key_o,100); delay(100); simulate_key(key_k,100); delay(100); simulate_key(key_o,100); delay(100); simulate_key(key_k,100); wait(!event()); set(kdb,0);
Marquee
This is the bit that goes at the top of the cabinet and usually carries the name of the game in the cabinet.


This is the marquee I am using. I pinched it from somewhere on the web and modified it a little so that it was more purple, looked like it was coming out of water and had a lens flare reflection on it. If you want to use it just save it to disk. Its in two parts so make sure you get both halves. I printed it out and joined it up. In the future I may take it to a printers to get rid of the join. I have also added a light behind the Marquee which is well worth doing as it does improve the looks.
Sound
I hooked the soundcard up to a set of Cambridge Soundworks speakers. The ones that came with the creative soundcards a bit since. These speakers are tiny and fitted in the shelf behind the marquee and they also have an active sub.
Credits
I want to eventually try and get the coin door working. I don’t think I will go full hog and get a mechanism. I am going to try and get a leaf switch so that any coin that gets pushed through registers as a credit. For now I have hooked up a switch to the coin return button. I have an orange button below the coin slot that you press usually to return a jammed coin. I have lit it using a 12v bulb powered from the PC and placed a switch behind it that’s wired into the coin circuitry. This works quite well and looks good with it being lit up.
Screen Snapshots
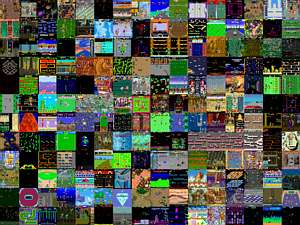
As you go through your games and start playing them don’t forget to hit F12. This save a screen shot of the game and adds it to the front end menu. You can download screenshots but I like doing it myself as it gives you a good indication of what you have tried.
Game Categories
Experiment with the different categories. You can sort games by name or by the most popular. You can also add games to a list if its good or bad or very good, and you can choose which ones to show or not show. At them moment I am just going through them adding the ones that don’t work to a broken category and opting not to show these. Once I done all them I will probably start classing them into if they are good or not, and which ones are foreign or use different controllers.
HiScore
Make sure you download the latest hiscore.dat from www.mame.net so that you keep a record of your hiscores as it will give you something to beat and increase the lastability of some games. This file should go in the same directory as mame.

Keyboard
Ok so I got a cabinet with arcade joysticks and buttons but how do I get that to talk to the PC. It seemed there was two ways of doing this. A keyboard hack or a Keyboard programmer. I tried the keyboard hack first. Each button on the arcade cabinet has a micro switch and each joystick has four, one for up, down, left and right. Each Micro switch has two wires leading from it and when the switch is closed it makes a circuit. A keyboard works in a similar way, each key when pressed makes a connection on two wires. The combination of these two wires gives a value. This value is then interoperated into a keyboard character.

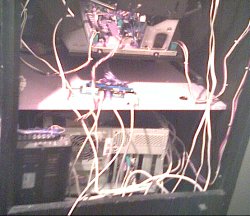
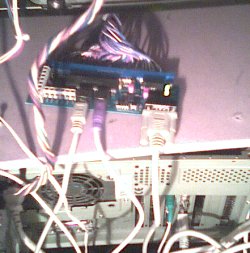
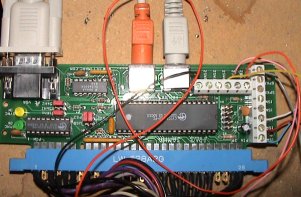
After doing some reading on the web I pulled apart an old keyboard. There was a circuit board in there like in the picture that interfaces the keyboard with the PC. It had one set of 8 wires and a set of 14 wires leading from it to the keyboard. I chucked the keyboard away and just kept this bit. I found this software on the web that tells you what key you are pressing. I then got Darrel to draw up an 8 x 14 table. He then got a piece of wire and touched it from on of the points in the 8 block to one of the points in the 14 block. This produced a key combination that the program on the PC displayed. He wrote this character down in the table and then did the next one. So for example touching pin 2 of the 8 block and pin 6 of the 14 block may have produced a W. He built up this table with the aim of finding all the keys that MAME used by default.
For example, for player one MAME uses the up cursor to move up so we needed to know what combination of pins produced that key stroke. Say we found that pin 4 of the 8 block and pin 12 of the 14 block produced the up cursor arrow. The idea is to wire those two pins to the microswitch that controls up on the joystick. You then do this for all the keys that you need.
I started to do this and proved that it did work but for me it was a lot of trouble and I had also read that it leads to something called ghosting. If you’ve ever pressed a bunch of buttons on your keyboard at the same time and had other buttons not work or produce incorrect results (i.e. press the “a” and result in a “g” being entered), then you’ve experience ghosting!
I found this excellent product which I would recommend to anyone that is thinking about doing this. Its called the J-PAC and it basically does all the connections for you. The J-Pac is a circuit board that comes with a cable that plugs into the keyboard port on the PC and has a passthrough port if you wish to plug a keyboard into it as well. It then has a standard JAMA connection on it that you just connect direct to your JAMMA connector on your cabinet. I was lucky that I had got a JAMMA cabinet. JAMMA is just a standard and it lets you swap games in and out of the cabinet quickly. All the controls and monitor in the cabinet are wired into a JAMMA connector to let you do all this quickly and with little fuss. The J-PAC just slots onto this and presents the standard MAME keyboard commands to the PC. It really was that simple. I plugged this baby in and pressed a button and the PC recognised it as the one I wanted. Move the joystick and again it recognised it correctly. It even has an alternate configuration as well so you can set up combination key presses to functions. For example I really needed an escape key to get back to the menu. J-PAC has this mapped automatically to hold 1 player start down and press 2 player start. Saved me having to wire an extra button onto the cab 🙂
So at this stage I had a PC with Windows running MAME32. The arcade controls were connected to the PC via the J-PAC and I was running MAME on an PC Monitor outside of the cabinet and all was working well. At this stage I had not powered on the cabinet. All the power that was needed for the J-PAC was being provided by the keyboard connection.
I was well impressed. It really was that easy to get to this stage. The J-PAC also has a monitor connector. This allows you to plug this into your PC and it will drive the arcade monitor through the JAMMA connector. I had no idea if my arcade monitor in the cabinet worked but the next task was to find out.
Upgrades
Was getting annoyed that I couldn’t play Mortal Combat properly with only 3 buttons on the cabinet. Ordered 18 new buttons, 2 x 6 + 1 x 6 spare and micro switches and also two new joysticks so I couldn’t blame my poor performance on an old joystick anymore. Got them from the UK branch of Happ controls https://www.happcontrols.com/.
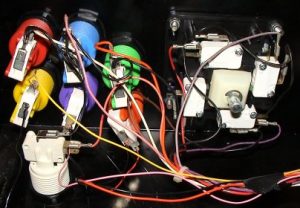
Adding the extra buttons wasn’t too bad. The hardest thing was figuring out what tool to use to make the holes for the buttons. There was space under the 3 original buttons to add 3 more per player. The control base was metal, I went into homebase to have a look for ideas and found a metal drill bit that the standard drill bit part way and the rest of it was like a file. The idea being that you drill into metal as usual and then once u have punched through use the file part of the bit to make the shape you want. I marked out 6 circles big enough to take the new buttons and then drilled as much of the circle out as I could and then tidied it up with the file. I replaced the 3 original buttons first and then added the extra ones. I think I pulled apart an old parallel cable to use the wire. First I up the common ground to each of the new microswitches and then took a wire from each switch to the J-PAC. Yet again the J-PAC proved its worth in gold as it made connection very easy for the extra buttons. I then swapped the joysticks out on a 1 for 1 basis. On the larger pic of the J-Pac you can see the markings on the PCB telling you which slot to screw the wires into such as 2SW4 for 2nd player switch 4.
I abandoned the DOS version and am now running Windows XP. I was so fed up with trying to get the soundcard to work in DOS everytime I made a change and I also wanted support for some of the newer console emulators as well. I posted a request out to a maillist I subscribed to and asked what was the best and most pain free way of upgrading to Windows. A few people recommended ArcadeVGA from Ultimarc, the same place I had got the keyboard interface from. This would let you run Windows and output resolutions that the Arcade monitor wouldn’t get upset with.
I had big probs trying to get it to run stable with Windows XP when it arrived so I ran Windows ME for a bit until I got some time to have another go. When I finally did I had exactly the same problem as before and try as I could it just would not behave. After sending an email of to the guy at Ultimarc and getting assurances that the card was good with XP it came down to either my card was faulty or the PC just didn’t like XP and that card. I tried another PC and it worked first time.
With XP on there I could run MAME from a command line and it worked great. The card really did the business so I set about getting the Front End working. I tried advancemame again but could not get it to run the setup program. I had seen other people recommending a frontend called Mamewah so decided to try that. It was very simple to set up and I was up and running with it very quickly. Its a good bit of software with support for multiple emulators. The only thing I miss is the ability to easily categorise games.
Mamewah now fronts Mame, SNES, Gameboy Advance, Nes, Megadrive and Daphne emulators.
I have upgraded the hardware in the cabinet as well. Daphne (Laser Disc, Dragons Lair Style Emulator) played mpeg2 video and some of the newer mame games were using hard disk images. All these were no good being run from a network drive so I needed a bigger hard disk and a faster processor. I went for a cheap AMD XP 1700 and a budget motherboard along with 256mb of DDR memory which I got all in for 100 quid. Most of the games now run really sweet, even mortal combat 3 :D.
12th March 2014
I have just upgraded the PC again due to the old PC not survivng the damp winter. This time round I decided to try and use Windows 8 as the Operating System. I had a few issues getting Mamewah working but got there in the end.
Head over to the Mamewah site and download the System.zip file.
- Extract the files to a folder on your C: drive such as C:\mamewahsystem
- Delete the Setup.bat file
- Run Vbrun60.exe as an administrator
- Rght click on COMDLG32.INF and choose “install”. Do the same with the other .inf files (MSCOMCTL.INF, MSCOMM32.INF, MSVBVM60.INF, PAINTX.INF)
- Find a copy of the file dx8vb.dll which is a Visual Basic file needed by Mamewah but is not included in Windows. Seatch Google or look for it on a old Windows XP machine in C:\windows\system. Once you have it put it in your new folder
- Open a command line in administrator mode and navigate to the directory where you unzipped system.zip i.e c:\mamewahsystem
- Enter regsvr32 paintx.dll and hopefully you will get a message saying that it has installed successfully to the registry.
- Enter regsvr32 dx8vb.dll and hopefully you will get another message saying that it has installed successfully in the registry.