Around summer 2003 a friend lent me a projector as I had told him I was considering buying one. My TV experience before that was a 28″ 4:3 telly. The projector was great, managed to hook it up to a laptop and got some good results on movies, even though at the time we were just projecting it onto a wall.
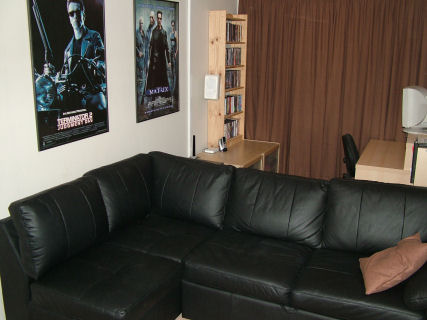
I already had a surround sound setup that had grown from early days when I used to have a separate yamaha surround sound decoder that I used to plug into my HIFI amp and had since replaced with a dedicated cinema amp receiver.
After deciding that I liked the projector I went looking to get myself one. I initially went for Sony and found a reasonable priced projector at the time for around £1400. I had a quick look at it in the shop but when I got it home I wasn’t impressed with it. My biggest problem was the chicken wire effect. It was very noticeable with this projector. You could really see the # pattern around each pixel. I took the projector back to the shop and looked at their next one up which was just over £2000. This was a lot more than I had originally wanted to pay but after looking at the results I just wasn’t happy with the cheaper one.
I upgraded to a new projector about a year later and that is the one that I am currently using. The newer model was slightly brighter and had more colour definition.
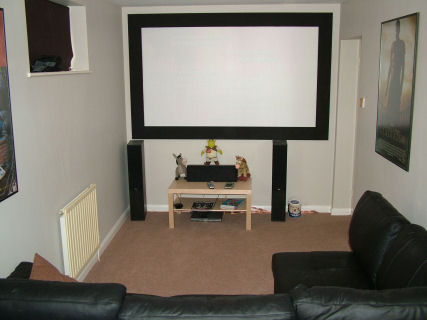
I have a dedicated room for the projector as I have found that the room does ideally need to be darkened to get best results. Using a proper screen does help but the picture is a lot nicer if there is no sunlight streaming into the room.
Projector & Mount
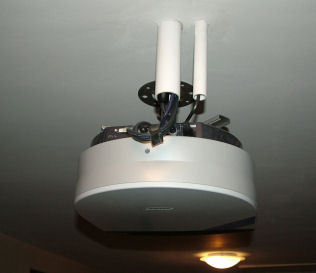
The projector is ceiling mounted using a cheap £30 bracket that I got on ebay. I previously used a stand for it that I made when I had it on the back wall of another room but adjustments were always difficult. With these proper mounts its a lot easier to centre the picture. The wires go up into the attic via some plastic pipes. I made two pipes one for power and for picture cables. I didn’t do any testing to see how much interference I got from the power cable I just thought if I could separate them it was probably best to do so. The projector is powered by a plug socket that is in the attic. I have considered putting a UPS on it as I did loose power once whilst the projector was on and it switched off without doing its cooling cycle. Bulbs are expensive for projectors so I may do so in the future. I got 2800 hours from the first bulb in this projector and a replacement costs around £230, expected life span is usually around 2000 hours but because of the darkened room I have been able to use the projector on a lower setting which extends bulb life and reduces noise from the projector.
The Projector is a Sony VPL-HS20. I was very impressed with it when I got it but do realise that there are better for cheaper now. Its a little on the noisy side and could be a bit brighter but it has severed well. Got what I consider to be a good length out of the bulb, around 2800 hours on the first one before it gave up. It does support High Definition up to 1080i and has the usual video connects including component and hdmi.
Screen
I made the screen myself. I looked around on the internet for screens and found them to be expensive. When I considered I just needed a fixed screen, one that didn’t roll up or down I thought it would be worth having a go making one. I did a search and found company that provided the material for the screens a bit like https://www.screensuk.co.uk/diy.html. It comes on a roll much like any other fabric would. I also did a search on how to attach it and found a site that explained how you stretch canvas if you were to paint onto it so I followed those instructions, a bit like here https://www.rexart.com/stretching.html. The frame was made out of pieces of contiboard, I got a bit lazy making it and didn’t mitre the corners which would of looked better but as its all painted matt black you cant really tell. The contiboard was joined together using some metal L shaped plates that were screwed in. Using the instructions on how to stretch canvas I then stretched the material over the frame and stapled using a staple gun. The only slight variation was that I folded the material over a few times so that I was stapling through a few layers rather than just a single layer of material, and I stapled it to the back of the frame not the top bit.
Kit

This is a list of my current kit which you can see crammed into the cupboard on the right. Does get quite hot in there with the freeview box and the media streamer kicking out quite a bit of heat.
Starting at the top
Pinnacle Showcenter 200
This is a media streamer. The device itself contains no storage. It purpose is to play media from a server / servers elsewhere on the network and display them on the screen. It will play movies, mp3s and pictures. The main reason for getting this box was that it supported component connections and HD movies. I’ll list the connections and the formats that the box will display in a bit but I basically have a network cable going into.. to allow it to talk to the server… it does support wireless but wired is more stable… a digital audio cable into the amp for sound and component connections into the amp for picture. On one of my servers I run the pinnacle software which can be used in two ways.. there is the organised way where you add tag information to each movie so you can search on action, crime, drama etc.. or if they are part of a series you can group things together or how I do it is just set up a watch folder so anything that you dump into a folder on as server is listed in like an explorer view so it looks just like you were looking at your files structure on a pc. I have had some good results with it. Fast forward / rewind not as great as what I would of liked but it plays around 98% of all movies I have tried and its easy to use, although the interface could be smartened up a bit
Connections
- SCART 21-pin connector
- Component video output (YPbPr, 3 x RCA)
- Composite video output (1 x RCA)
- Y/C (“S-Video”) video output (1 x Hosiden)
- Stereo audio outputs (“Line-Out” – 2 x RCA)
- Additional stereo audio output (for separate connection to audio system – 2 x RCA)
- Digital audio outputs, both optical (1 x Toslink) and electrical (S/PDIF 1 x RCA)
- Ethernet 100BASE-T (1 x RJ-45) with associated connection/data LEDs
- Integrated Wi-Fi 802.11g, interface with built-in antenna
- USB Connector on front panel
Supported File Formats
- Music: MP3, MPEG-1 layer 2 (MPA), PCM WAV, WMA, Incompatible audio files (such as WMA lossless, WMA Pro) will be converted to MP3 at 192 kbit/s.
- Video: MPEG-1, MPEG-2, MPEG-2 VOB, MPEG-4 AVI, Xvid, WMV9.
- HD Video: WM9 HD up to 1080i, WM9 HD up to 1080i with DRM, MPEG-2 HD up to 720p, MPEG-4 HD AVI up to 720p Incompatible video files (such as DV) will be converted to a ShowCenter compatible format as set by the user.
- Images: JPEG, BMP, PNG and GIF
Thomson DHD4000
This is what we use to watch TV. Its a twin tuner freeview box with a hard disk so you get to watch digital TV but also have the ability to record it to hard disk as well. This has a number of advantages… no tapes to mess around with, no degradation of picture quality and the fact that its always recording the channel that you are watching to disk means that you can pause it or rewind it. Very useful if you want to start something a few minutes late and then fast forward all the adverts.
- 40Gb Hard Disc Drive.
- 20 hours of recording time.
- Digitally interactive.
- Digital text.
- RF loop.
- Digital audio broadcasting (DAB).
- Digital video broadcasting (DVB) subtitles available.
- 14 day electronic programme guide (EPG).
- 2 SCART sockets.
- Composite connection
- SVHS connection
- Analogue and Digital Audio connections
- Size (H)5.5, (W)36, (D)26cm.
- Weight 2.44kg.
I have since upgraded the hard disk, which was very easy to do.. just a question of swapping it out for a new, bigger one. The machine prepped the disk itself and made it available almost straight away. The disk that I put in now gives us around 50 hours of recording time.
The box does get very hot and occupational jumps a bit, which I believe is partly to do with the quality of the signal that we get and a bit of lack of tolerance with the box.. but I don’t have another freeview box to compare.
This box is connected to the amp with an SVHS cable for video and a digital optical cable for audio.
Sony DVD Player
I went for this DVD player for its progressive scan and component output. Which did give me better results with the projector than the DVD player that I had before. I haven’t tried one of the later DVD players that can now upscale and I have also read that some of the higher end AV amps can do this as well. This player plays most of the DVD formats that I have thrown at it. I use component connects for video and a digital coax cable for audio.
Yamaha AV Amp
This is the hub of it all.. Everything goes through this box. It has composite, SVHS and component connections to the Projector. It also has all the 6 speakers plugged into it as well. 3 Front speakers, 2 rear speakers and 1 sub. I didn’t feel the room was wide enough to warrant a center rear speaker to be connected. I went for as at the time it seemed to have more than enough connections for what I needed as my previous amp was struggling with digital sound connections. The component connections on this amp and digital sound connections can be mixed and matched to allow you to assign them to the different sources.
I have recently started to look at a new amp for the following reasons.
- More Component / HDMI connections.
- Automated sound setup
- Upscaling video connections
I did find amps that had these options now but these still seem to be at the very top end and I cant justify the cost. I have ran out of component connections currently as I recently got an xbox 360 that also uses component and the amp only has 2 which are taken up with the DVD and media streamer.